Understanding the basics of EXIF Data for reviewing paranormal photos
We as a community are becoming pretty good at being able to debunk photos presented as ‘paranormal evidence’. If you want to learn more about some of the natural things that can be misinterpreted as paranormal and paranormal photography in general, here are some links to some articles I have written.
Digital Vs Film Photography, Which is Better?
Is it paranormal or is it just slow shutter speed?
Understanding the different causes of ORBS
The Dos and Don'ts of photography during paranormal investigation
Just because it's called ghosting doesn't make it paranormal
Why flash photography should not be used on paranormal investigations
Your full spectrum camera doesn't really see in the full spectrum
You will find in these articles and in pretty much any article written about photography will make mention of something called ‘EXIF Data’ or Metadata. You can put a photo through a program to download this information easily which is great. But what do you do with this information and what does it all mean? What are the things that you need to look for? Do you need to know what aperture is? I am going to walk you through all the information you need to know when it comes to EXIF Data in terms of analysing a photo for paranormal ‘evidence’.
What is EXIF Data?
EXIF Data stands for Exchangeable image file format. This is information that is embedded in the digital photo file which can tell you the kind of conditions that the photo was shot in, such as the shutter speed, if the flash was used, as well as time and date settings (provided they are correctly programmed into your camera). Most devices now pinpoint the geotag showing the GPS location where the photo was taken. Any sort of digital photo file taken with a digital camera, smartphone or even scanned in by a scanner, will have this information saved within its settings. The file formats it attaches to are JPEG, TIFF & RAW. If shooting in RAW mode on DSLR, it may have a file extension specific to the camera or smartphone brand but in the majority of cases, you will be working with a JPEG file. It is also worth noting that if this information is missing from a file, it means that it has been edited and is not the original file that you have been given to review. Plain and simple if a photo has been edited, there is no point wasting your time. You should only be reviewing the original file when it comes to determining if it is something paranormal. Ask yourself, if a file has been brightened, de-hazed, enlarged and of course decorated with a red circle to show you where you should be looking, is the evidence really so groundbreaking? My first personal rule for reviewing photos is that if it is not the original file, move on.
How to access the information
There are several ways to access this information and a lot of it depends on what software you use to upload your photos to your computer and what operating system you are using.
Windows:
Right-click on your JPEG image and click on properties and go to summary.
Mac:
Select the file that you want and go to file, Get Info.
There are several different ways to access the information through different photo programs as well. If you don’t know how to do it, go to the HELP section in the application and search for how to view EXIF data or Metadata.
But what about if someone has sent you a photo to review or uploaded a photo to Facebook and asked for an opinion? This tends to be the most common scenario for review in which you will need to look at this data. If the image is in its original form, you will be able to put a link to this image and upload it to an EXIF Data viewer program and it will be able to give you all of this information.
A great free program you can access this information is exifdata.com/
Now that we can retrieve the data, what does all of this information mean?
Here is a photo of typical EXIF data. While someone who knows a bit about photography can easily interpret this information, some of you may be thinking what do all these funny names mean and are they relevant to me? You really don’t need to worry so much about things like aperture and focal length when you are analysing a photo for paranormal reasons as they are not really relevant in this case. What are the basics you need to look for?
I have highlighted the key things you should be looking for in RED.
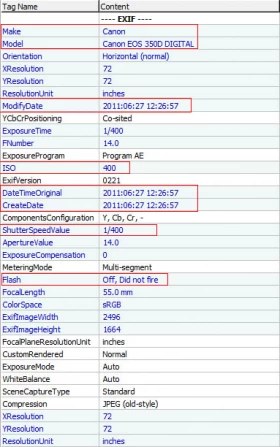
Make & Model: This is more to validate the conditions in which the person submitting the photo is telling the truth. If they told you they took it on their mum’s camera and it tells you that it was really taken with a smartphone, you know straight away they are lying. If they are lying about that, what else are they potentially lying about?
DateTime Original, CreateDate & Modify Date: You basically want to make sure that the creation date is the same as the modified date. If the modified date is different, it means that the photo has been manipulated in some way. The dates can also match up with the person’s story. It is worth noting however that on a digital camera if they have not programmed the date and time it will be incorrect anyway so don’t read too much into this.
ISO: A lot of people don’t really consider this when looking at photos but it is one that I feel is important. ISO is basically the camera’s sensitivity to light. Even though this is usually set to automatic, on DSLR cameras and by using a smartphone app, you can change the ISO settings. It can allow you to shoot in low light without using a flash. The higher the ISO number, the more light it has let in. What happens when you shoot with higher ISO? The picture ends up with a lot of noise and appears grainy. It is in these conditions that pareidolia is more likely to occur. If someone is saying they see a face in the doorway and the ISO of the picture is high (anything over around 400 and you will start to see digital noise you are possibly dealing with pareidolia). So if you see a photo and the ISO is 3200, the grain is caused by the lighting and the faces you are seeing in this grain are simply pareidolia. The lower the number, the clearer the photo will be and the less chance there is that the grain will cause pareidolia. Smartphones today are REALLY good now at providing higher quality images in low light, however in order to do this, the shutter speed is longer which can cause some problems of its own.
Shutter Speed: We know that the shutter speed is how long the shutter is open during a shot and it works in conjunction with the ISO but we won't get too technical here. What you need to know is, the longer the shutter is open, the more opportunity it is for motion blur to occur. A safe shutter speed for someone holding a phone or camera is considered to be around 1/60. Others may have a different figure, however, I have landed on this figure based on a photography course I did and that was the speed I was taught was 'safe'. Anything slower than this (such as 1/30, 1/15 and so on) means motion blur is possible and the blurry image you can see on the photo is probably just a person or object that is blurry because they or the person holding the camera has moved. Think about all the times you have tried to take a selfie during an investigation and you end up blurry because it has taken about 5 seconds for the phone to take a photo. If you move you end up blurry!
Flash: This one is pretty simple. It will tell you if the flash was used or not. We know how the flash can bounce off objects to cause orbs etc. Quite simply, if the flash was used and you see orbs in the picture, in my eyes it is debunked. People will often swear the flash did not go off, but the EXIF data says otherwise.
So these are the very simple things that you need to look out for when reviewing the EXIF Data. Remember, photographs are very unreliable for a number of reasons. They can be easily manipulated by a person or natural causes. By arming yourself with this knowledge, you make the process a little bit easier. Remember the EXIF doesn't lie, people do.
What are your tips for analysing photos?
If you enjoy LLIFS, consider buying me a book (otherwise known as buy me a coffee but I don't drink coffee and I LOVE books). Your donation helps to fund the LLIFS website so everyone can continue to access great paranormal content and resources for FREE!

Top pages with similar subjects
Pepper’s Ghost 4206
Don't forget to follow the Facebook page for regular updates
Join the mailing list to receive weekly updates of NEW articles. Never miss an article again!
Buy the latest and past issues Haunted Magazine
Check out the books written by LLIFS
Comments
-
Shane mckay 6 years ago
Thank you for this ;this will help with our investigations and know what to look for in our photos we take