Things to look for when analysing a photo
In the past, I have used my studies into photography to help provide information in a way to help people understand just why that floating orb in a photo is not paranormal in the same way that a blurry person is usually a real person and not an apparition. For this reason, people often ask if they can send me photos to look at. I do so only sometimes with very strict conditions. The first is that I will be completely honest and that most likely the person submitting the photo is not going to like what I have to say. If they are looking for me to verify it is paranormal, they have come to wrong the place. If they want help to figure out what it truly is, then yes I will help. They also must submit to the full unedited original photo as well as the photo before and after it was taken and of course a brief explanation of what was going on. We have a discussion and I try to give them tips to be able to debunk it themselves without me telling them the answer.
There are so many different things and ways you can try to analyse and debunk a photo as well as a lot of different phenomena to be aware of - pareidolia being a big one. So I wanted to offer some of the tips I give to others to help explain their photos. This is not a complete guide, but more some tips of the most helpful things that help me when looking at photos. First, you need to decide which program you are going to use to look at the photo. I personally use Photoshop as it allows me greater control over the tools I use, however not everyone has access to Photoshop so the information below is based on the programs that already come on your computers or are free to use on the internet! But first .....
EXIF data is your friend
EXIF Data stands for Exchangeable image file format. This is information that is embedded in the digital photo file which can tell you the kind of conditions that the photo was shot in such as the shutter speed, was the flash used as well as time and date settings (provided they are correctly programmed into your camera). Some devices can even pinpoint the geotag showing the GPS location where the photo was taken. If this information is missing from a file, it means that it has been edited and it is not the original file that you have been given to review. Plain and simple if a photo has been edited, there is no point wasting your time. You should only be reviewing the original file when it comes to determining if it is something 'paranormal'. Ask yourself, if a file has been brightened, de-hazed, enlarged and of course decorated with a red circle to show you where you should be looking, is the evidence really so ground breaking? The first rule of reviewing photos is that if it is not the original file, move on.
The information can be accessed through the photo program you use on your computer. It can also be accessed by uploaded the image online to: exifdata.com/
Most importantly this will tell you if a flash has been used, a slow shutter speed etc. If you would like to know more about as to why this type of information is important, you can read this article I wrote: https://llifs.com.au/blog/understanding-the-basics-of-exif-data-for-reviewing-paranormal-photos/
Invert the photo
After I have checked the EXIF data, if I haven't yet worked out what is happening, I will then invert the photo. When you invert a photo, you are essentially swapping the colours around. Sections that were bright now become dark and vice versa.
The great thing about inverting colours is that it is SO easy to do! If you have a Windows computer, MS paint has the tool or the preview tool on a MAC. Mobile phones also have apps where you can do this. It is very honestly one of the first things I do as it offers a great perspective as to what is going on.
Here are instructions on how to do it on MS Paint (PC) https://www.techwalla.com/articles/how-to-invert-a-picture-in-paint
Here are instructions on how to do it on Preview (MAC) https://osxdaily.com/2019/07/27/how-invert-image-mac-preview/
You can also do the same using online tools such as https://raw.pics.io/invert-image
Here is an example of a picture as is and then inverted.
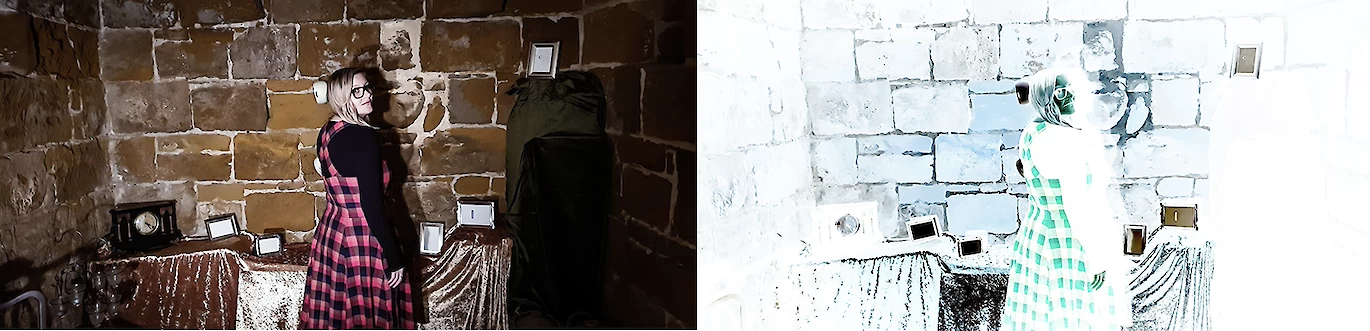
The reason why this is helpful as it brings the darkness into the light. Often this will help highlight dark figures and can really help to tell if a figure is human. It also highlights shapes depending on how far you invert the colours. While there is nothing paranormal happening in this photo it is giving a clearer picture of the items in the room. It can also help you see things you may not have noticed originally which could be stationary objects in a room. You can see my shadow against the wall in the first photo is now white in the second photo. It is a great way to see if that thing you think is paranormal is really just a shadow that is cast by something else.
Increase exposure
Another thing to try is to increase exposure. By doing this, you are essentially adding more light to the photo. A lot of photos are taken in the dark or have a lot of dark corners or dark spots hiding in the photo. I like to increase the exposure so that I can see what is happening in those areas that may be able to fill in blanks to work out what is going on. This can be particularly useful when you are reviewing a series of photos. We always ask for 3 photos in a row so that we can get a more accurate picture of what is happening. Many times for example, a person seems to pop into a photo out of nowhere and people think it is paranormal. In reality, a person is just moving from one side of the room to the other yet because the lighting was low, you can't see them in the other photos. They are literally walking out of the shadows into your shot and disappearing.
To increase the exposure, you will see in your photo tools an option that says exposure. The more you increase this, the lighter it will make the photo.
When increasing the exposure, however, you have to be mindful that things may not be as they seem. When you increase the exposure, it is likely going to make the photo appear grainy which can cause you to see things in the grains that are not there (pareidolia)
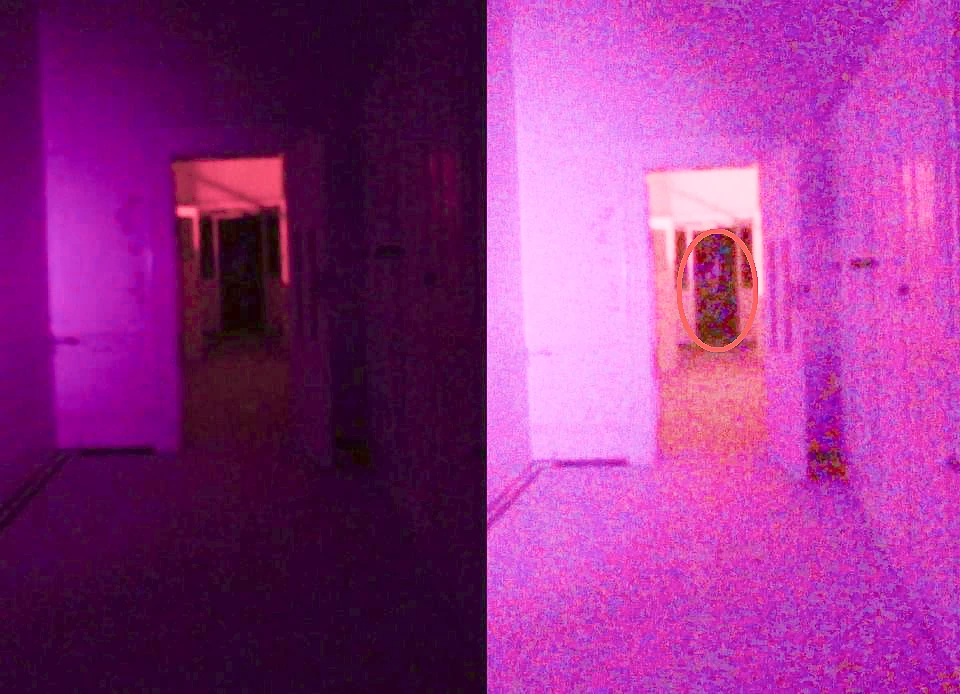
This is a photo I took at Aradale in the admin building. On the left in the original image, it appeared like there was an image in the doorway. When I increased the exposure and lightened the photo, it appears like there is a shadow figure standing in the door. In reality, this was actually a fire extinguisher that I discovered when I went back to debunk the photo. If I had not lightened the image, I wouldn't have been prompted to go back and check hence discovering the fire extinguisher on the wall. This leads me to the next point
Look at the shadows or highlights
Reflections and shadowing can cause us to see things that aren't really there. If you have photoshop, you can look at the shadows or highlights by following these instructions: https://helpx.adobe.com/au/photoshop/using/adjust-shadow-highlight-detail.html
You could also do this in your paint or preview programs or even using the settings on your mobile phone. There are settings for both shadows and highlights. You can turn them up or turn them down making them more prominent or fading them. It will allow you to see where light is coming from and what it is bouncing off and where the shadow areas are. There have been a few photos I have seen where reflection and shadow has caused pareidolia.
Try to recreate the photo
Ultimately as cool as photographs are, they are not reliable. They are but a frozen moment in time. The moments leading up to and afterwards are vital pieces of the puzzles that are not captured by a single photo. This is why video is so much more reliable as it adds context to the situation. When you see a photo, if possible return to the location and take the photo again in the same conditions. Look around the room either in daylight or turn the lights on. Are there any objects you are possibly mistaking as the object in your photo? If it is a blurred object, see if you can recreate the effect by using a slow shutter speed. Look around for cobwebs (these tend to interfere with photos a lot). If there are no cobwebs around (they could have cleaned since you were last there), see if you can find one to try and recreate the effect. Retrace your steps and look at things as a whole (not just the picture itself). It may offer clues or hindsight of what was really happening.
If it is too good to be true, it is a ghost app
Unfortunately, people still seem to be using ghost apps. Beyond that, they are also using photoshop or layering tools to put several photos together to deliberately make it look like that there is something paranormal in the photo. If it looks like the typical 'horror movie ghost', it has probably been inserted in. The EXIF data will be able to tell you if it is the original. If they play dumb or cannot provide the original photo, you have to assume they have edited it because very simply, if they edit it in anyway (even using a ghost app) the exif data usually disappears.
There have been many in the past who have tried to keep a database of the different figures that are in ghost apps for people to use as a debunking guide (myself included). This became almost impossible as there were so many apps out there and you had to pay for them too. You can try to do a reverse image search in google to see if the figure pops up in any other images or on any websites. This is instructions on how to do that: https://support.google.com/websearch/answer/1325808?co=GENIE.Platform%3DDesktop&hl=en
If it doesn't pop up, it doesn't mean that an app hasn't been used, it just couldn't find it on google. Just remember if it looks too good to be true, then it probably is!
The unsaid rules
If you are going to look at photos or take photos to review for yourself, there are some basic rules that should be followed:
1. Always ask or review the photo before and after the alleged photo. It will give you some hints as to what is happening. If for example, the thing you have spotted in question is not moving at all across the 3 photos, it is likely to be a fixed item like the above fire extinguisher. This was the first clue to me that it was something fixed within the room because across the 10 photos I took of that doorway, my alleged figure did not move at all.
2. Don't rely on a person's memory. I can't tell you how many times I have been sent a photo of a blurry figure and straight away I have thought it is a real person. The person taking the photo will swear to me that there was no one there or they were in another room. They will say everyone was accounted for no one was in that area so it couldn't possibly be a real person. When I then look at the photos leading up to and afterwards, often I will see this real person walking in and out of the frame and they were indeed the 'apparition' in question. The person taking the photo is not lying. They legitimately didn't see them because they are focused on taking the photo, not who is in the room so it is quite likely they just didn't notice the person there.
3. Ask to see the video. While not everyone has access to be able to video, if you can ... do it! Refer to the video of the moment you captured the photo. It will give you an unbiased look at what was happening. The majority of the time you are able to figure out what was happening. In fact, the whole thing looks completely different with video as now you have the full context of the situation. Remember a photo is but a snapshot in time.
4. Don't put a red circle on the photo of what you think you see! If you are submitting the photo to someone, submit it as a whole without the red circle. Do they see what you see? If not, it is likely a case of pareidolia. If you have to point something out with extreme detail, is the photo really worth all of that time? There are some truly head-scratching photos out there. None of them has needed a red circle.
If you are taking photos yourself, here are my Do's and Dont's: The Dos and Don'ts of photography during paranormal investigation
There is so much to consider when it comes to paranormal photography. One of the biggest being that just because someone cannot explain what is happening in a photo doesn't make it paranormal. I suppose like anything though if a photo can through a whole process and no one can properly explain with certainty what it is, it goes in that special pile that we all have that keeps us here looking for the unknown. Is it validation of that? Maybe or maybe not but it is what keeps us searching.
Below is a list of all of the photography articles I have written which will help you understand more about things like slow shutter speeds and using a flash:
Digital Vs Film Photography, Which is Better?
Understanding the different causes of ORBS
Just because it's called ghosting doesn't make it paranormal
Why flash photography should not be used on paranormal investigations
Slow shutter speeds and paranormal photos
Painting with light to create a ghostly photo
So tell me below! What are your tips for reviewing photos?
If you enjoy LLIFS, consider buying me a book (otherwise known as buy me a coffee but I don't drink coffee and I LOVE books). Your donation helps to fund the LLIFS website so everyone can continue to access great paranormal content and resources for FREE!

Top pages with similar subjects
Pepper’s Ghost 4251
Don't forget to follow the Facebook page for regular updates
Join the mailing list to receive weekly updates of NEW articles. Never miss an article again!
Buy the latest and past issues Haunted Magazine
Check out the books written by LLIFS